Monday, August 22, 2016

Creative inputs for a new feel in your home!

Case 1: Buy a home-do the interiors-implement new decor elements
Case 2: A few years later... feel the need for a new look-renovate your home

But what happens a few more years down the lane, that is once again when you get bored of the same old appearance...One cannot keep on spending on home decor...this is when you try and bring about little changes here and there which may not necessarily mean a huge dent on your pocket.

Some subtle yet noticeable changes in one's decor can be done in the following manner.

1. Add new decor accessories.Keep rotating the accent pieces so that you never get to see the same pieces all the time.You will agree that there comes a point in life where you have collected so many pieces that all cannot be displayed together.Create a new vignette every once in a while. Here comes the most valid thing to do...keep your pieces in Rotation!


2.If possible create a new sitting area with elements  that is not entirely new but a simple mix-match of existing items with certain recent purchases.This will give a totally different feel to the room.


Create a cosy nook such as this one.Existing stuff assembled in a new corner gives a whole new dimension! The change has to be dramatic and not really big in terms of the elements involved.

3.Dig out your attic.It may hold those vintage/antique stuff that you may have totally forgotten about!


I loved this unit.Imagine you have these beauties stored away in your loft but when you have the right unit to display them together, it is as if you have hit the jackpot! And this display shelf ( If I may call it so! ) is very simple in terms of the design but does total justice to the antique collectibles!

4.Small changes like a partition designed to separate one area from another, can also work wonders in lending a completely new look to the existing space. 


Again a very easily do-able partitioned shelf that acts as a pot holder as well as gives you the much necessary privacy.

Very recently I came across a space which had been separated by a large wooden window with several small squares built within.Each square held a brass lamp hanging.I felt it was a very novel idea and the wooden window can be made to suit your dimension.Image from my phone ...just to give you an idea..You can implement the same with lesser number of squares.


5.Highlighting your walls also helps to change the overall feel of a space.Paint textures on the walls or just a simple wall decal can enhance the corner and wall decals come at affordable prices and can be implemented involving minimum time.


These were certain simple easy tricks .Any other suggestions that you can think of?

Images are sourced from here

Monday, August 15, 2016

Freedom from damp walls and leakages

The most cherished dream of millions of Indians is to buy a new home for themselves. We too were no exceptions. When we moved to Bangalore about four years back, we stayed in a rented flat but come weekends and we used to go house hunting. After what seemed as if an eternity, we got to finalize on a flat in South Bangalore in a very premium complex by a very well-known builder.

We were literally over the moon and to top it all, the flat which we had liked after taking into various considerations like the layout, direction, ventilation, space, privacy factor, vastu etc, was the sample flat. We were of the opinion that this particular flat would therefore be ideal and extra care would have gone into its making!

Initially itself we did see a black spot on one of the walls in the guest bedroom. But with all the excitement around, that was not really taken very seriously. The minute spots were in the topmost corner of one of the walls. Gradually as all the paper work was taken up and after possession of the flat we started with the interior work. Luckily for us, wardrobes were not planned on that wall .You will soon realize what major trouble we got into because of those tiny black spots that literally gave us a nightmare after few months of staying in our home. We moved into our sweet home in February. By June as it started raining, those tiny black spots slowly tuned bigger with each passing day. We could not gather how the dampness was forming on the wall .It was not an external wall too! The spots turned into a noticeable patch and to top it all our guest bedroom is used as an office room by my hubby and his workstation faces that very wall! So it was now not only aesthetically disturbing but also posed a health risk.

Health implication: Monsoons are associated with dull and gloomy weather and what with work pressures mounting, the dampness made it further worse. We contacted the owners of the flat above us and realized that they have a bathroom right above the damp wall and they had changed the floor and wall tiling in the bathroom. So atleast now we could make out the exact reasoning for the dampness.

Dampness is a serious issue as it promotes microbial activity over a period of time and can result in allergic reaction to its occupants. In Bangalore weather it only aggravates if the person has sinus tendencies.

What followed was a constant struggle with the owners and their plumber. (They resided out of Bangalore!)Waterproofing perhaps was not taken up properly and as the tiling in the bathrooms were exposed to water, slowly it started showing on our walls.

Condition of the wall: Two years on and off with the dampness, the black spots turned ugly and flakes and peeled paint had started showing up! The owners were very co-operative as we realized the problem and the solution attached. The stress that we went through was enormous.

Solution: Waterproofing was initiated and carried out successfully. I became actively involved in the repair stage because enough was enough and I needed to assure myself that things were carried out efficiently. Dr Fixit the expert in bathroom waterproofing came to our rescue. So now there is no dampness in the wall but the wall bears a permanent mark which can now be rectified only when it gets a fresh coat of paint. I guess we should have immediately taken up waterproofing but as time passed it only worsened the situation in hand!

Through this post I wanted to stress on the importance of waterproofing the right way! If only we had paid heed to the tiny marks on the onset it would not have extended so far. Somewhere the happiness of buying, moving and settling down in our new abode was a little dampened because of the dampness in the wall and the constant following up.

Learn a lesson from our experience and whether a new or a re- sale flat ensure that waterproofing is done properly and get freedom from damp walls and leakages

This independence day am really happy and I can very proudly state that not only my country is into its 70th year of Independence day celebration but as a home owner I have got freedom from dampness as well!


Watch this very informative video on waterproofing by Dr. Fixit here. You will enjoy the educative and humorous story conveyed by our legendary actor Amitabh Bachchan.

Next time looking for any answers on Home Renovation or Trends in Home decor,do visit thehappyhomes.co.in

Saturday, August 13, 2016

DO-IT-YOURSELF Gift Envelopes for Rakhi

Festivals are just around the corner.So are you getting ready for it? Giving and receiving gifts is definitely part of all the festive fun.

Rakshabandhan the festival,celebrating the relationship between brothers and sisters is just a week away.So the custom is...the sister ties a sacred thread around the wrist of her dear brother and the brother is supposed to gift his sister. As little kids celebrate the festival,parents hand over some cash to the boy who in turn gifts it to his sister.

So today let us try out an easy- peasy DIY to make money envelopes.It is very easy so you can even encourage your young boy to make it himself probably with a little help from you and fill it with money from his piggy bank and hand over to his sister on Rakhi!

Take four circles of similar sized handmade paper


Fold each circle in half


Now we have to stick each circle over the other in the manner shown


Stick the last piece onto the rest of the 3 pieces as well!
So this is what we have now...Keep the money in between  and secure it with a twine or a wool
Wasn't that easy?

Your money envelope is ready! Embellish it the way you want!
Some points to note:

1. I made these using an invitation card but you can use handmade paper for enhanced effect.

2.You can embellish it with quilled flowers, real rose buds, faux paper flower or anything that you like!

3. If you want to make a bigger envelope just increase the diameter of the circles.

4.You can even personalise by writing notes for your sister on either side of the envelope

5. Last but not the least you can make such envelopes and keep them handy for future use.Many a times I have had to rush to the nearest stationery shop when invited for a wedding.

You can check out my earlier post on gift wrapping if you are gifting something other than cash .

Wednesday, August 10, 2016

An office where fun and work co-exist!

I work from a home office operating from a small table that serves as my desk space cum my laptop space, writing table and what not.The only solace is that I face a fabulously maintained lawn outside the window.

So when I came across an office that has a space constraint but has been so  meticulously designed that what you see is a wide expanse of open area in front of you. It has a relaxing cafe or lounge like ambiance such that work becomes fun!

 Without beating around the bush,let me reveal the address of this creative office area.
Creative and digital agency, ColourCraft Studio, blurs the lines with its new Mumbai headquarters designed to reflect its identity, values and culture.


ColourCraft Studio is a 1600 sqft space in Prabhadevi Mumbai and true to their design philosophy of functionality,aesthetics and minimalism they created an office space within a tight budget and a record time  of two months! How is that and there is more to this ....


So many fine details that one may take for granted have been all well thought, planned and put into execution.

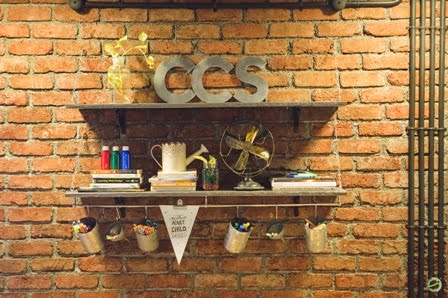
A creative environment needs open space.How did CCS ensure that? Well, they have lofty ceilings,nothing is concealed. right from exposed brick walls,pipes that run though out the office,no separate cubicles but one big open plan which ensures better interaction and exchange of ideas too!

What I especially liked at CCS and felt that other small offices and entrepreneurs can implement   are:

  • Community table that doubles up as a lunch table
  • Open deskspace without separators for flexible seating and collaboration 
  • Electrical outlets on the table as opposed to below the desk where it is inconvenient 
  •  Hooks under the table for hanging bags 
  •  Moveable white and black boards for brainstorming anywhere 

Another great idea was to have conference room double up as bar or a lounge. After having tackled the space issue the next step was to have an aesthetically pleasing environment.I truly loved the quirkiness factor induced in CCS. If an area is too minimalist in structure it may hit upon as a cold and stark place to work at. But this was taken care with antiques sought from Chor bazzar.

The quirky appeal...


Old Switchboards...


I love the rustic appeal it carries...


The creative adult is the child who survived!... so so true


Nature in all its glory!

The employees can't ask for more what with features such as surround speakers with soothing music, a bar and a game area equipped with carrom,tennis and football and the topping on the cake with the aroma of coffee from an espresso wafting in the air!

The key elements to be noted from the designing of ColourCraft Studio


  • Any space can be converted into a creative zone with proper planning
  • Adding fun elements results in a productive environment
  • Space and expenses can always be managed to our benefit, if the principles of Form function and aesthetics are in balance.
Do You work from a place like this?If so, share with me .I will be glad to feature it here.

And peeps we are into August from where all the fun and festivals begin.I have a simple DIY for you.Stay tuned!


Monday, August 8, 2016

Transform your sarees-Reduce, Reuse & Recycle

Yesterday was ‪#‎NationalHandloomday‬ as we all know. Saree is my personal favourite. It can never go wrong on anybody, let me assure you that.Whenever I get a chance I drape a saree.
Equally favourite is the concept of 3R' s. ‪#‎Reduce‬ ‪#‎Reuse‬ ‪#‎Recycle‬ or‪#‎Upcycle‬
Now, are you wondering what I am getting into.Being a decor blogger I was thinking of ways to use our sarees in more ways than one! The sarees of our mothe'rs and grandmother's, that feels so warm when felt, even after ages of being put into regular use... our wedding saree that sometimes are so heavy and loaded with intricate work that somehow do not even see the light of the day...All these have a better chance of being noticed, if we use them wisely! So have a look into various ideas that can transform the gorgeous six and nine yards into decor accessories.
Have you tried any other way to put them to good use? Let me know peeps!
(Disclaimer: The first three are pinterest images.The rest two are mine)


Benarasi I guess...Brings about the festive spirit when used as a curtain
Framed and cushioned!

Frame the sarees and the lovely memories associated with them!
Turning them into cushion covers is another fab idea

Our very own south cotton sarees into blinds.Simply loved the colour combo of orange and red with the wooden frames on the windows.


 This is part of my mother in law's wedding trousseau.I have converted it into a runner for my dining table.

This is my mother's saree from which she made me a lovely potli ! A perfect accompaniment to the saree-draped Me!

Wednesday, August 3, 2016

Interesting twist to ordinary jars

‪#‎Reduce‬ ‪#‎Reuse‬ ‪#‎Recycle‬

Yesterday, as I was cleaning my kitchen shelves, I came across a huge stash of jars and bottles.You know those jam bottles and pickle jars variety.Some of them come in  nice shapes  and sizes, so I never had the heart to throw them away.At the same time, over a period of time we collect so many apart from the jars that we are lured into buying.

Now, my suggestion... do not throw them away. Put them into good use by simply giving them a little DIY tweak.

Remember the three R'S ...Reduce,Reuse, Recycle (Up cycle)


Ordinary jars?
Step 1: Give the jars a good wash.Remove the label.

Step 2:Scout for old fabric scrap.

Step 3: Here we are going to revamp the lid of the jar

Step 4: Cover the lid with your choicest fabric.It can be printed, plain, striped anything that you like.

Step 5: Cut  one size bigger in dimension to the actual lid. Now on the inner side of the lid, just stick it with glue.

Step 6: You can leave it at that too! I have gone one step further by cutting some floral patterns on felt craft and tied it atop the jar lid.You can even use this jar to gift your loved one with home made cookies and treats!

Transformed...


Similarly,for the second jar, I simply painted the lid with acyrlic colours. Give a coat of varnish by applying modpodge or a mix made of equal quantity of water and fevicol. As far as possible store dry snack.so that you do not have to wash the lid often.

Do you find this worth experimenting?

You can read more on Reduce,Reuse and Recycle here and here.

As the festival season is fast approaching watch for more DIY tips and tricks.
Related Posts Plugin for WordPress, Blogger...